The Ultimate Guide: How to Mount a Trolling Motor to Your Kayak for Enhanced Fishing & Exploration
Every kayak angler has felt it. You’re fighting a headwind that’s pushing you faster than you can paddle, or you’ve finally found the perfect spot, but holding your position in the current is a constant battle. If you’ve ever thought, “There has to be an easier way,” you’re in the right place. Motorizing your kayak is a game-changer, transforming your paddle craft into a versatile, efficient fishing machine.
But the thought of drilling holes into your prized vessel and messing with batteries and wiring can be intimidating. Where do you even start? This guide is your answer. We’re going to break down the entire process—from choosing the right gear to tightening the last bolt. Think of this as your complete roadmap to successfully and safely mounting a trolling motor, giving you the power to go farther, fish longer, and enjoy your time on the water more than ever before.
What We’ll Cover
- Pre-Installation Planning: The critical first steps before you drill a single hole.
- Step-by-Step Installation Guides: Detailed instructions for every common mount type.
- Wiring and Battery Management: How to safely power your new motor.
- Testing Your Motorized Kayak: Ensuring everything works perfectly before you head out.
- Maintenance & Care: Protecting your investment for years to come.
- Troubleshooting Common Issues: Quick fixes for when things don’t go as planned.
- Frequently Asked Questions (FAQs): Answering the most common questions about motorized kayaks.
Pre-Installation Planning: Essential Considerations
Success lies in the preparation. Rushing into your kayak motor mount installation without a solid plan can lead to frustration, poor performance, and even damage to your kayak. Before you pick up a drill, let’s walk through the essential decisions you need to make.
Kayak Compatibility & Type
Not all kayaks are created equal when it comes to motorization. Your kayak’s design will heavily influence your mounting options.
- Sit-on-Top (SOT) Kayaks: These are the easiest and most common kayaks to motorize. Their open decks and flat stern areas provide plenty of real estate for transom mounts, and their internal hull space is often ideal for battery placement.
- Sit-in Kayaks: Mounting a motor on a sit-in kayak can be more challenging due to the cockpit design and often-rounded stern. You’ll likely need specialized side mounts or custom-fabricated brackets to get the job done.
- Inflatable Kayaks: Don’t count these out! Many manufacturers offer specialized mounting kits that glue or strap onto the stern tubes, providing a solid platform for a lightweight trolling motor.
- Pedal Drive Kayaks: Many pedal kayaks, like those from Hobie or Native Watercraft, have motor-ready features. You can find mounts designed to integrate with the rudder assembly or drop into the pedal drive slot, offering a seamless setup.
Choosing the Right Trolling Motor
Your motor is the heart of the system. Picking the right one involves balancing power, control, and features.
Thrust (lbs)
Thrust is the measure of the motor’s power. It’s not about speed—it’s about the force to push your kayak through the water, especially against wind and current. For kayaks, you don’t need a massive amount of power.
A good rule of thumb is to have about 2 lbs of thrust for every 100 lbs of total weight (kayak + you + gear).
- 30-45 lbs of thrust: This is the sweet spot for most kayaks ranging from 10 to 14 feet. It provides plenty of power for most conditions without being overkill.
- 50-55 lbs of thrust: Consider this range if you have a larger, heavier kayak (like a tandem or a loaded-down fishing rig) or frequently face strong currents and winds.
Shaft Length
The motor’s shaft must be long enough for the propeller to stay fully submerged during operation but not so long that it drags on the bottom in shallow water.
- 30-36 inches: This is the most common and effective shaft length for the vast majority of kayaks.
- 42 inches or more: This might be necessary for kayaks with exceptionally high sides or if you’re using a bow mount, but it’s generally too long for a typical stern mount.
Control Type
- Hand Tiller: The simplest and most common control. You steer and control speed with an extendable handle directly on the motor head. It’s intuitive and reliable.
- Remote Control: Many modern motors, like the Minn Kota PowerDrive or Bixpy jets, offer wireless remote control. This is a fantastic hands-free option, allowing you to steer from anywhere in the kayak.
- Foot Pedal: More common with bow-mount motors on bass boats, but some kayak setups use them. They offer excellent hands-free control but take up valuable deck space.
Mounting Location Options
Where you place the motor is one of the biggest decisions you’ll make.
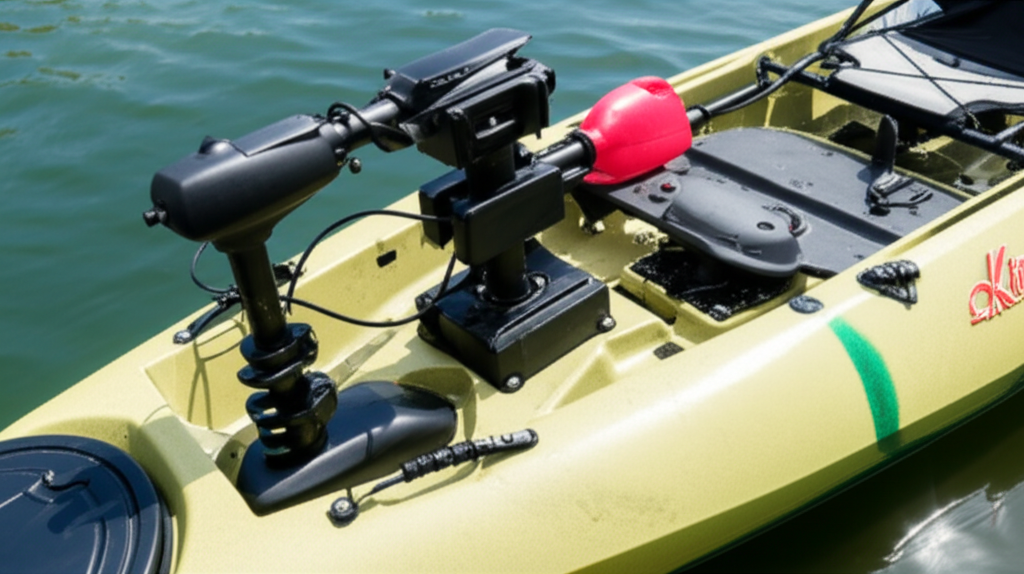
- Transom Mount (Stern): This is the most popular DIY option. A mount is bolted to the stern, and the motor clamps on, just like on a small boat. It’s great for steering and provides excellent propulsion.
- Bow Mount: This setup offers superior boat control, especially with features like Spot-Lock, which uses GPS to hold your position automatically. However, bow mounts are more complex, expensive, and often require reinforcing the kayak’s bow deck.
- Side Mount: A versatile option, especially for sit-in kayaks or canoes. A bracket is attached to the side of the kayak, usually just behind the seat. The main drawback is that it can create an unbalanced pull, affecting steering.
- Scupper Hole Mount: A minimalist option for specific sit-on-top kayaks. A mounting post goes through a scupper hole, with an arm to hold the motor. It’s a clean setup but only works on kayaks with compatible scupper designs.
Battery Selection & Placement
The battery is your fuel tank. Choosing the right one and placing it correctly is critical for performance and stability.
Battery Type
You must use a deep cycle battery, which is designed to provide steady power over a long period. Never use a car (starter) battery, as it’s designed for short, powerful bursts and will be quickly ruined by the demands of a trolling motor.
- AGM (Absorbent Glass Mat): A type of sealed lead-acid battery. They are heavy but reliable, cost-effective, and maintenance-free. A 100Ah AGM battery can weigh a hefty 60-70 lbs.
- Lithium-ion (LiFePO4): The premium choice. Lithium batteries are about one-third the weight of AGM batteries, offer a longer lifespan, and provide consistent power until they are fully drained. The trade-off is a significantly higher upfront cost. A 100Ah lithium battery weighs just 20-30 lbs, a massive weight saving for a kayak.
Battery Capacity (Ah)
Measured in Amp-hours (Ah), this tells you how long the battery will last.
- 50Ah: Good for a half-day of fishing with moderate motor use.
- 100Ah: The standard for a full day on the water, providing roughly 4-8 hours of continuous run time depending on your speed and conditions.
Placement
Battery placement is crucial for maintaining your kayak’s stability. The ideal location is low and centered in the hull, often in the front hatch or directly behind the seat. Always secure it in a waterproof battery box to protect it from the elements and prevent it from sliding around.
Tools & Materials Checklist
Gathering everything beforehand makes the installation process smooth.
- Tools: Power drill, drill bits, wrenches or socket set, screwdriver, measuring tape, sealant gun.
- Materials: Your chosen motor mount, marine-grade stainless steel hardware (bolts, nuts, nylon locking nuts, washers), marine silicone sealant (like 3M 5200 or 4200), a waterproof battery box, and a circuit breaker or inline fuse.
Step-by-Step Installation Guides
Alright, planning is done. Let’s get to the fun part. Here’s how to tackle the most common installation types.
A. Transom Mount Installation (Most Common DIY)
This is the go-to method for most sit-on-top kayaks.
B. Bow Mount Installation (More Complex)
This is for the serious angler who wants ultimate control with features like Spot-Lock.
Wiring and Battery Management: The Power System
Proper wiring isn’t just about making the motor run; it’s about safety.
Testing Your Motorized Kayak
Before you head out for a full day, you need to conduct a shakedown cruise.
- Pre-Launch Checklist: At home, connect everything and briefly turn on the motor to ensure it spins up. Double-check that all bolts on the mount are tight and that the battery is secure.
- On-Water Test: Find a calm, safe body of water for your first test.
- Start at the lowest speed setting and check how the kayak responds.
- Practice turning and maneuvering.
- Gradually increase the speed, paying close attention to the kayak’s stability. Note how the added weight of the motor and battery affects the balance.
- If anything feels loose or unstable, head back to shore immediately and address it.
Maintenance & Care for Longevity
A little care goes a long way in keeping your setup running smoothly.
- Rinse After Every Use: Always rinse the motor, especially the head and propeller, with fresh water after each trip. This is absolutely essential if you’re using it in saltwater to prevent corrosion.
- Battery Care: Recharge your battery as soon as possible after use. Don’t store it in a discharged state. During the off-season, keep it on a trickle charger or top it off every month.
- Inspect Your Mount: Before each trip, give your motor mount a quick wiggle. Check that all bolts and connections are still tight.
Troubleshooting Common Issues
- Motor Won’t Power On: Check your circuit breaker or fuse first. Ensure all connections are tight and corrosion-free, and verify your battery is fully charged.
- Reduced Power/Speed: The most common culprit is something wrapped around the propeller. Check for weeds or fishing line. It could also be a sign of a low battery or a poor electrical connection.
- Mount is Loosening: The vibrations from the motor can loosen bolts over time. Regularly check and tighten your mounting hardware. If it’s a persistent problem, you may need to add larger backing washers on the inside to better distribute the load.
Frequently Asked Questions (FAQs)
Do I need to register my motorized kayak?
Laws vary significantly by state. In many states, adding any form of mechanical propulsion (electric or gas) legally turns your kayak into a “motorboat,” which requires registration. Check your local boating regulations to be sure.
How fast will my kayak go with a trolling motor?
Don’t expect speedboat performance. Kayak hulls aren’t designed for high speed. A trolling motor will typically push a kayak at a comfortable 3-5 MPH. The goal is effortless propulsion, not speed.
How long will my battery last?
This is the “how long is a piece of string?” question. It depends entirely on your motor’s amp draw, your battery’s capacity (Ah), your speed, and conditions like wind and current. A 100Ah battery will generally provide a full day of typical fishing use (moving from spot to spot, not running continuously).
Can I use a car battery for my trolling motor?
No, absolutely not. As mentioned before, a car battery is a “starter” battery. It’s designed for a massive burst of power to start an engine. Draining it slowly with a trolling motor will destroy it very quickly and leave you stranded. You must use a deep cycle battery.
Conclusion: Enjoy Your New Motorized Kayak Adventure!
You’ve done it. You’ve planned, drilled, and wired your way to a fully motorized kayak. The days of fighting the wind are over. Now you can explore new waters, cover more distance, and focus more on fishing and less on paddling. This newfound freedom opens up a world of possibilities on the water. So get out there, be safe, and enjoy the effortless glide of your new and improved fishing kayak.